

How to Install Proxmox on a Raspberry Pi
Install Proxmox on a Raspberry Pi
Section titled “Install Proxmox on a Raspberry Pi”Proxmox officially announced in early August 2026 compatibility of Proxmox Virtual Environment for 64-bit ARM platforms. However, you need a machine with UEFI, and Raspberry Pi devices are not officially supported. We’ll see how to install it anyway.
For the demo, I have a Raspberry Pi 5 with 8 GB, connected to the network via RJ45. The OS must be a Raspberry Pi OS Lite on Trixie minimum, or any compatible Debian Trixie OS. For this tutorial, I recommend working as root. Otherwise, add sudo at the start of each command.
-
Disable cloud-init
Section titled “Disable cloud-init”To configure Proxmox VE, we’ll need to change how networking is handled. To avoid overwriting the configuration on every reboot, but still keep the ability to run cloud-init for VMs, we’ll disable cloud-init management on the machine without uninstalling it:
Fenêtre de terminal touch /etc/cloud/cloud-init.disabledAfter this step, you can resume the official installation documentation by skipping the step for installing the Proxmox kernel.
-
Configure the network
Section titled “Configure the network”In this example, the Raspberry Pi uses
192.168.3.50and the gateway192.168.3.1. Adapt these two values to your network.Configure the hostname. Replace
127.0.0.1before your hostname with your IP:Fenêtre de terminal nano /etc/hostsFenêtre de terminal ...192.168.3.50 pve2 pve2127.0.0.1 localhost...You can verify the change has been applied by running:
hostname --ip-addressProxmox uses ifupdown2. Install
ifupdown2and remove NetworkManager:Fenêtre de terminal apt install -y ifupdown2apt autopurge -y network-managerThen edit the interface file to create the bridge, adjusting it with your IP and gateway:
Fenêtre de terminal nano /etc/network/interfacesauto loiface lo inet loopbackiface eth0 inet manualauto vmbr0iface vmbr0 inet staticaddress 192.168.3.50/24gateway 192.168.3.1bridge-ports eth0bridge-stp offbridge-fd 0 -
Add the Proxmox VE repository
Section titled “Add the Proxmox VE repository”Fenêtre de terminal cat > /etc/apt/sources.list.d/pve-install-repo.sources << 'EOF'Types: debURIs: http://download.proxmox.com/debian/pveSuites: trixieComponents: pve-no-subscriptionSigned-By: /usr/share/keyrings/proxmox-archive-keyring.gpgEOFThen download the GPG key:
Fenêtre de terminal wget https://enterprise.proxmox.com/debian/proxmox-archive-keyring-trixie.gpg \-O /usr/share/keyrings/proxmox-archive-keyring.gpg -
Update Debian
Section titled “Update Debian”Do a quick “spring cleaning” by installing the latest packages and removing anything left over from older ones.
Fenêtre de terminal apt updateapt -y full-upgradeapt -y autopurge -
Install Proxmox VE
Section titled “Install Proxmox VE”Install the main components:
Fenêtre de terminal apt install -y proxmox-ve postfix open-iscsi chronyThen remove
os-prober, which can sometimes cause issues:Fenêtre de terminal apt autopurge -y os-proberThe Enterprise repository is installed by default. If you don’t have a subscription, disable it:
Fenêtre de terminal echo 'Enabled: no' >> /etc/apt/sources.list.d/pve-enterprise.sourcesThen verify that everything went well:
Fenêtre de terminal systemctl --failedThe command should only return an error:
Fenêtre de terminal UNIT LOAD ACTIVE SUB DESCRIPTION● watchdog-mux.service loaded failed failed Proxmox VE watchdog multiplexerLegend: LOAD → Reflects whether the unit definition was properly loaded.ACTIVE → The high-level unit activation state, i.e. generalization of S>SUB → The low-level unit activation state, values depend on unit typ>We’ll fix this minor issue later.
-
Create the Proxmox VE user
Section titled “Create the Proxmox VE user”By default, Raspberry Pi OS configures a user with sudo and a root account without a password. The only account configured with PAM authentication for administration access is root, but you won’t have the password. You can set a password for root, or (simpler) create an administrator Proxmox account for your user.
For example:
Fenêtre de terminal pveum user add admin@pamAssign it administrator privileges:
Fenêtre de terminal pveum acl modify / --users admin@pam --roles AdministratorReplace
adminwith the name of the account you want to use. -
Access Proxmox VE
Section titled “Access Proxmox VE”From a browser:
https://192.168.3.50:8006Replace
192.168.3.50with the IP address configured earlier.Log in with your
@pamuser. -
Disable the watchdog
Section titled “Disable the watchdog”Raspberry Pi OS and Proxmox VE each have a watchdog. To avoid conflicts, we disable the one from Raspberry Pi OS.
Create the directory:Fenêtre de terminal mkdir -p /etc/systemd/system.conf.dThen create the configuration file:
Fenêtre de terminal cat > /etc/systemd/system.conf.d/99-no-watchdog.conf <<'EOF'[Manager]RuntimeWatchdogSec=0EOFReboot to apply the change.
Fenêtre de terminal rebootAfter the reboot, run again:
Fenêtre de terminal systemctl --failedThis time it should return:
UNIT LOAD ACTIVE SUB DESCRIPTION0 loaded units listed.
Proxmox on Raspberry Pi
Section titled “Proxmox on Raspberry Pi”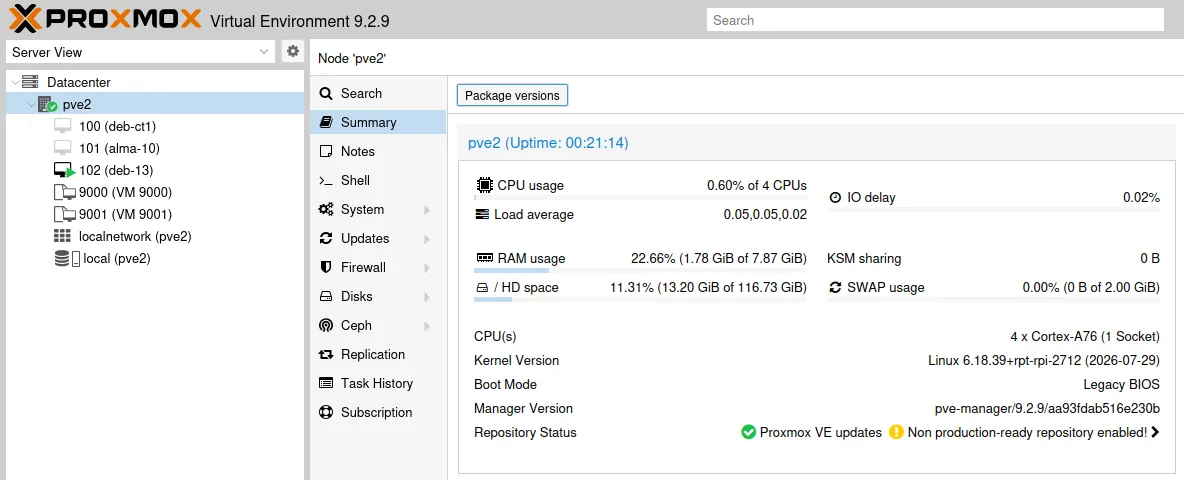
This installation lets you experiment with Proxmox VE on ARM64 on a Raspberry Pi. You can test your favorite VMs and LXC containers—just make sure to use the ARM64 versions. If you own multiple Raspberry Pis, you might even be able to experiment with a cluster.
That said, this solution shouldn’t be considered an officially supported Proxmox installation for a production server. Beyond the low performance, I’m concerned about the lifespan of the SD card for this kind of use. Using an M.2 setup would likely be more appropriate.
For a standard, officially supported Proxmox server, choose an x86-64 or ARM-64 UEFI machine. UEFI projects exist specifically for the Raspberry Pi 4 and 5, so it’s worth testing!
If you’re interested in installing an encrypted version of Raspberry Pi OS, you can find the method on my blog.